Thursday, August 4, 2011

DIY Picture Frame Clock


Here's an easy way to make your own clock! I absolutely adore clocks, but the ones I like the most tend to be too pricey {which is probably because I like really big clocks!}.

I was searching around the Internet to see if there were other examples of DIY clocks but alas, I was left disappointed. There really aren't very many tutorials in Cyberland on how to make your own clock. I only found a few on CraftGawker, but they weren't to my liking. So I figured out a way to make my own, and I'd love to share step-by-step instructions with you on how I made mine!

What I used...
~ Frame of any size {I used a 16"x19" frame from my dad's house. You can even buy cheap picture or art frames from Goodwill or Salvation Army. DO NOT BUY A BRAND NEW ONE! Save your money.}
~ Sandpaper {I used 180 grit}
~ Kilz spray primer
~ Spray paint {Krylon is an awesome brand}
~ Clock Kit {I bought my 3/8" kit from JoAnn's}
~ Mod Podge
Optional Items: Card stock, acrylic paint, stencils


What I did...
{1} Select frame. I took that picture of our family dog in high school so I'm going to save that!

{2} Sand down the frame, but ONLY if you don't like the way it looks! If you want to keep the frame as it is, skip down to Step {5}, you lucky dog, you! This was an absolute pain for me to sand because this beast had so much detailing to sand around! Wipe the frame down with a slightly damp rag and let it dry.

{3} Primer the frame by spraying multiple coats of Kilz. Make sure to wait for each coat to dry before spraying your next coat. This step can actually be optional as well, I just like to have a nice bright white base for my top color to stand out beautifully. If you would rather stain and Polyacrylic your wood after sanding, then you definitely shouldn't primer.

{4} Spray paint your frame. This one took several coats because it's such a light color but I absolutely adore how bright and happy it looks! Just lovely!


{5} I taped a stencil to the sheet I wanted for my clock face with painter's tape and then started painting with a gorgeous subtle silver acrylic paint. I globbed the paint on and wasn't going for a perfection at all, especially after I smeared the paint after pulling the stencil off {I bet you can't see it though!} I was thoroughly thrilled with the result.

{6} Poke a hole where your clock kit will go. I used a screwdriver to poke a hole through the cardboard that came in the frame and my painted {but now dry!} stenciled clock face sheet.

{7} Grab your clock kit!

{8} Follow the kit's instructions for installing it into the hole you made.


{9} The clock hands that came in the kit were way too short for the size of my clock, so I had to improvise a little bit by cutting longer hands out of cardstock and gluing them on with Mod Podge to the hour and minute hands from the kit.

{10} I cut out my clock numbers from the same cardstock after stenciling them backwards {so the pencil lines don't show on the front!}. Glue the numbers on with Mod Podge. I also used a flower punch in the cardstock for the remaining clock numbers.


Now I can see how late the time is getting when I'm busy crafting in the craft room!

What do you think? If you make your own clock, I would really love it if you shared with me!

Wednesday, July 27, 2011

New Button!

I'm so glad that I was finally able to find a tutorial to make my own blog button {--> check it in the upper right hand corner!}

Thank you so much to Oikology for the tutorial!

Tuesday, July 26, 2011

Book Page Headband


I don't know what's more exciting for me as a crafter, making something myself or making something for myself that was also originally my idea!

There's lots of cool stuff being made with books and book pages. Last week I made a little chalkboard with decoupaged dictionary book pages on the frame {I still have to post pics of that!}. But most of the things I've seen are for home decor and very few book page crafts for hair accessories. So that means I just had to come up with my own!

What I used...
{1} Dictionary pages
{2} Mod Podge
{3} Leftover vinyl material from our ottoman. There is a TON of this stuff still in our house! I think that's one of the biggest motivators for coming up with ideas to use it up!

What I did...
First, I cut a piece of vinyl out and a dictionary page in the same size {8" x 1.5"}. Then used Mod Podge to glue the page on top of the vinyl. You can do a second layer of Mod Podge on the surface of the paper like I did to ensure it stays on.

Be patient and wait for it to dry completely! I am so bad at this but I'm getting better.

Then I accordion folded the vinyl and sewed it on to a stretchy headband


I kind of liked it but it made me feel like a French maid. Justin suggested I add another ruffle and make it into a round shape, like a flower.


So that's what I did! I thought about hot gluing a button or round black circle into the center but I think it's cute just the way it is.


Can't wait to wear this one to work! Well, I'm actually just wearing it around the house right now, ha!

Inspiration Field Trip

Yesterday, I started sanding down this beast of a picture frame in hopes of turning it into a clock. By the way, I took and developed that picture of our family dog, Max, in my high school photography class. I'd like to save it for a different frame because the picture's sentimental to me.


I call this frame a "beast" because not only is it pretty large {16" wide and 19.5" long}, but the detailing makes it so tedious to sand!


That's a lot of gold to sand off! Blegh...

I have been wanting to make a clock for awhile now but just wasn't sure how I wanted it to look. This tutorial from The Hand Me Down House has given me some direction but it's not exactly what I want since it's small and has no numbers. The double frame is a super cool idea!


The gray is just lovely! It's strange but gray is one of my absolute favorite colors.

Clocks without numbers look incomplete to me, like whoever made it just gave up and didn't want to bother trying to make it functional {no offense, Amanda! Your clock is gorgeous!}. Also, I just lack the talent to try and tell time without numbers.

So I was seriously lacking in vision for my clock. I Googled images of clocks and nothing really suited my fancy. I noticed that there is a huge lack of homemade clocks.

After I had been sanding The Beast for almost an hour {I am so not done...}, my husband suggested that we take a drive up to the mountains to get away from the hear. One of the greatest things about living in Cali is that you can drive an hour and a half where it's 20 degrees cooler than the valley's sweltering heat and you're surrounded by incredible beauty! I thought this would be perfect to help me get inspired for my clock. What could be more inspirational for a project than seeing the handiwork of the original Creator?

We packed up the little man and our dog and headed for Huntington Lake. We actually ended up going a bit higher to 9,000+ feet. Here's some pics...


One thing I kept eyeballing was the differing textures of bark on the various types of trees.


So gorgeous! I knew that I wanted my Beast frame to be painted aqua to go with my craft room, I just wasn't sure what I wanted the clock face to look like. From our little road I got me some inspiration and thought it would be cool to try and make a clock face with a bark texture.

I better get back to sanding! More to come...


Saturday, July 23, 2011

Manzanita Framed


Justin and I went hiking and "piddlefartin'" above Shaver Lake late last year when the snow had just started sprinkling on the ground for the winter. There were weathered manzanita branches everywhere and my heart leapt at the sight of them! I knew they would be perfect for a project, I just wasn't sure what {an awful feeling, I tells ya!}

They have been sitting in a bucket in our backyard since then getting even more weathered and I felt bad that I couldn't come up with anything special for using them. It's absolute torture to have a passion for creating, the supplies and the means to do it with, and yet no inspiration. But I think the most painful part is having your husband stare outside and ask dryly, "When are you going to do something with those?" Ask the Muses that one, honey! And let them know I'm looking for them!

Well anywho, I had to clean out my old bedroom at my dad's house and I acquired a whole grip of picture frames. It was a bittersweet day, like he was breaking up with me but giving me lots of great craft supplies to dull the pain {side note: I've been out of my dad's house for almost four years...but I can't say it doesn't hurt that he's moving on from me, ha!}.

So I made this frame after sanding it down, priming with Kilz spray, and painting with aqua acrylic paint {which I don't recommend doing because it's so thick}. I inserted a pretty scrap piece of paper and hot glued a manzanita branch. This is how it looked when I put it up on the wall...


It made my heart pitter patter but after a few minutes of gushing over it, I felt like it was incomplete and kind of bland {does that ever happen to you, fellow crafter/artist? Sucks, don't it?!}. Justin really liked it but even he said it was missing something.

So I thought "What could complete this?" Well, what completes me? My husby, of course! Hence the yellow heart and "j&d"...


Chalkboard with Dictionary Page Frame


From an artistic sense, I just adore things that are timeless: clocks, calligraphy, typewriters, mason jars and anything in nature. It reminds me of a slower and more simplistic life.

This project was a combination of two timeless things: book pages and chalkboards. I decoupaged the frame with dictionary pages and used Krylon chalkboard spray paint on the glass that came in the frame.


Before I could get a chance to primer the surface with chalk, my hubby wrote me a little love note...


Isn't he awesome? Thanks, Babe!

Wednesday, July 20, 2011

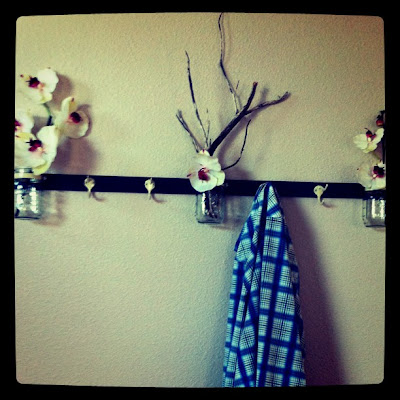
$10 Mason Jar Coat Rack


What's not to love about mason jars? Better yet, mason jars being used for something other than canning! This was inspiring to me by OldNewAgain, a "shabby chic cottage decor" Etsy shop. I found this link and pic on CraftGawker...


Just lovely! I especially like the aged look they gave to the turquoise-painted wood.

To make our own {bigger} version of this, we used...
~jars {$3}
~wood {free}
~hooks {free}
~hose clamps {$3+}
~spray paint {$3...optional for wood, hooks, and hose clamps}

{Side note: My husband had to clarify to me that they're called "hose clamps" and not pipe clamps since hoses are flexible and pipes are not...hence the reason why the hose clamps are adjustable}

From these things and for less than $10, we came up with this!

Justin found a box of mason jars at Target {12 for $12, but I know you could probably find them cheaper at other places}.

The wood was leftover in our garage from who-knows-what Justin was working on. Our garage doesn't store cars, it stores wood. We are one 2 by 4 away from opening up the garage doors and calling ourselves a lumberyard!

The hooks were on the wall of our laundry room from the previous owners. These babies got spray painted with a coat of Ace brand cream colored paint. Recommendation alert!: cheaper paint does not always equal better paint! You'll see why in one of the pics.

Hose clamps can be found in the plumbing section of the hardware store for a buck something. You can tighten or loosen the clamp with a standard screwdriver. We spray painted these the same color as the hooks.

For directions with the hose clamps, I got help from Whitney at Shanty 2 Chic who tried drilling {then hammering} a hole in between the clamp threads so a screw could fit through to hold the jar up.


Justin suggested this instead...
Take a standard screwdriver and bend the thread up. Then take wire cutters to cut the thread out.


I tightened the hose clamp around the neck of my jar so I could see how much of the excess clamp to cut off with wire cutters. I recommend doing this before you spray paint it {if you plan on painting}.

Now I don't know if...
{1} I'm just super impatient or...
{2} the fact that our garage turns into an oven when it's over 100 degrees outside has anything to do with it or...
{3) Ace brand spray paint really is that cheap...

...but after spray painting the clamps in the garage, some of the paint came off the clamp when I tightened them.

I think I was just being impatient and not letting the paint dry long enough. "Long enough" is a very subjective term when you're letting spray paint dry in a fryer of a garage!

Then we drilled the hooks and hose clamps into our wood and then tightened the clamps around the neck of the jars.


And of course it's not complete without some manzanita branches and orchids!

I thank my lucky stars for an incredibly handy husband who knows his way around a drill, leveler, and anchor screws! Thank you honey for helping me with this one! Now please put your shirt away...